
GAUMUKH TAPOVAN TREK ---
TREK TO THE SOURCE OF RIVER GANGA

Trek Cost :
₹ 15,000 + 5% GST (Dehradun to Dehradun)
ABOUT THIS TREK
Grade : Difficult
Region : Uttarakhand
Altitude : 4270 m
Trek Distance : 46 Km
Trek Days : 8 Days
Best Season : May to June & September to October
Nearest Railway : Dehradun
Nearest Airport : Jolly Grant
The Gaumukh-Tapovan trek is a magestic trek through the Bhagirathi river valley. This trek takes you to the base camp of a great mountain, Mt. Shivling. Tapovan is situated at the
altitude of 4,270m/14,270ft. The Tapovan is basically a high altitude meadow, a area of green on the west bank of the Gangotri glacier. Tapovan according to the mythology is a
sacred place where sages meditated. The mythological story is the King Bhagiratha(ancestor of Lord Rama) meditated here for the Lord shiva to descend Ganga on the earth. Tapovan is
lush green grass field in summer and a dry golden land on post monsoon season. And the literal meaning of Gaumukh is ‘Cow’s Mouth’, a glacier from where the Bhagirathi river originated
late on plane of India it is named as the Ganga river. The Gangotri glacier is about 24 kms long and 6/7 kms wide from the Chaukhamba massif to Badrinath. It is very thrilling that
gives goosebumps to the trekkers while witnessing the birth place of the greatest river. Camp over the tree line where peaks transfused with snow are just stone throw away is a
pure type of adventure. The mind blowing site of Mt. Shivling from Tapovan campsite from the base to the zenith, the glimps of Mt Meru never get you tired.
The valley is surrounded by stunning peaks, Bhagirathi I, II, and III, Mt. Shivling(6543m), Mt. Meru(6630m) and Kedar dome(6808). These peaks are the main attaction for which all the
trekkers rush to this valley not only indians but foreigners also. The view of so many 6000 meters mountains are very rare. By the way the popularity of Gaumukh Tapovan trek gets
very lower as of few years ago. As people find lots of low altitude short trek that gainged popularity in few years. But that is veryu silly, Gaumukh Tapovan is still a star trek. There
are no trek that offers a glacier that is a source of a great river with deep gorge.
Now some quick information about this trek. Gaumukh is a 46 kms trek, you need to cover it in 6 days excluding 2 days drive for arival and departure. It is starts from the pilgrims
famous choice Gangotri Town.
Gallery


WHY YOU SHOULD DO THIS TREK
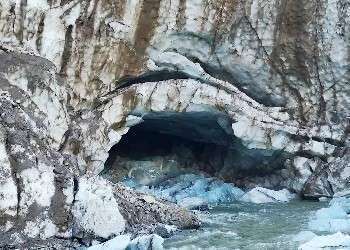
The Gaumukh Glacier
You just cann’t turn your eyes from the birth place of river Ganga. You will be stunned to witness that how a glacier is. Experiencing such gigantic glacier right infront of you is
none but a sheer joy. The snout of the Gaumukh glacier almost like a ten storey building. Large ball of ice, moraine boulders will surpriise you. There is a cave type under the glacier
from where the river starts flowing, is just stunning.
The Bhagirathi series of Mountains
The view of the Bhagirathi I,II and III mountains are so pleasing that you cann’t turn your eyes. On the other side across the glacier you can see the Bhagirathi series of Peaks. The
Bhagirathi massif standing lonely from bottom to top with few clouds around is mesmerising view.
Mt. Shivling from Tapovan
On the popular opinion the best view feels from the Tapovan. The Mt. Shivling from base to summit clearly standing right infront of you. On a cloud less moon night the Tapovan is
really a heaven, don’t be inside your tent, get out and experience the view around which gonna be one of the memorable view of your life. Not only that on the early morning left
your tent to capture some rare golden peak as on the first rays of sunlight. It is a big crime you miss those views after climbing all the hard path. And on the dark night there
will unimaginable uncountable stars in the night sky.
The sunrise and sunset
When you trek so close to high mountains above 6000 meters, don’t miss the sunrise and sunset. This two time there is a play of colors going on in the sky. Lots of foreigners
climb this trek to capture only sunrise and sunset views. The summits with fascinating colors lightens up the whole mountain. In experts opinion the evening is the more colorful
show that you forget everything in your life. If you are a sunset lover this sunset is going to be the best one of your life.
ITINERARY
DAY 1 | Arrive Gangotri Base
Drive 240 kms, 8/9 hrs from Dehradun and reach Gangotri. Reach by evening, tea and snacks will be there followed by dinner. Overnight stay at Homestay on sharing basis. Cab is included.
Altitude : 3,100m/10,200ft
Altitude : 3,100m/10,200ft
DAY 2 | Rest and Acclimatisation day at Gangotri
As you gain sudden altitude at 3,100m today is rest and acclimatisation day at Gangotri. After breakfast visit Pandav gufa, Gauri and Surya kund. Lunch at Homestay, after that you can
visit to the Gangotri Temple and hop for shopping if you need anything for the trek. We may have a acclimatisation walk on the KedarTal route.
Altitude : 3,100m/10,200ft
Altitude : 3,100m/10,200ft
DAY 3 | Trek Gangotri To Chirbasa
After breakfast start trek for Chirbasa through Gangotri National Park. 9 kms, 5/6 hrs. Moderate class uphill ascent. Hot lunch at campsite. Acclimatisation walk brfore evening, then
evening tea and snacks followed by dinner. Overnight stay at tents.
Altitude : 11,680ft
Altitude : 11,680ft
DAY 4 | Trek Chibasa To Bhojbasa
A easy day of trek. We can start late after breakfast. 5 kms, 3/4 hrs. Moderate level ascent. Hot lunch at campsite. Acclimatisation walk before evening, then evening tea snacks
followed by dinner. Overnight stay at Tents.
Altitude : 12,435ft
Altitude : 12,435ft
DAY 5 | Bhojbasa to Khada Pathhar Via Gaumukh & Tapovan
A challenging day of the trek. Start early after breakfast. 12.5 kms, 7/8 hrs. Tricky boulder terrain, limited water source. Hot/Pack lunch. Evening refreshment at campsite followed
by dinner. Overnight stay at tents.
Altitude : Gaumukh-13,452ft Tapovan-14,600ft
Altitude : Gaumukh-13,452ft Tapovan-14,600ft
DAY 6 | Tapovan to Chirbasa
Descend down by moraine zone till Gaumukh and further to Chirbasa. 12 kms, 6/7 hrs. Hot/Packed lunch. Overnight stay at tents.
Altitude : 11,600ft
Altitude : 11,600ft
DAY 7 | Chirbasa to Gangotri
Descend down from Chirbasa to Gangotri, 9 kms, 4/5 hrs. Reach Gangotri and overnight stay at Homestay.
DAY 8 | Drive back to Dehradun
After a morning breakfast your trip ends. Drive back to Dehradun. You will reach Dehradun by evening, book tickets and accomodation accordingly. Cab is included.
HOW TO REACH THE BASE VILLAGE GANGOTRI
Jolly Grant Airport is the nearest airport and the Dehradun railway station is the nearest Railhead. The Gangotri is 240 kms away from Dehradun. There is no direct bus from Dehradun to
Gangotri. You can reach Uttarkashi from Dehradun by bus, will take around 6 hours and cost 350. There are buses from 8:00AM onwards from Masoorie bus stand. Then take the shared cab for
Gangotri, from Bhatwari 500 meters away from Uttarkashi bus stand. The shared cab will cost around 300-350. There is no cab for Gangotri after 12/1 PM. Make sure you reach on time.
Otherwise you have to stay a night at Uttarkashi.
It is better to reach Gangotri by Cab, you can find shared cabs from Parade Ground, Dehradun to Gangotri, cost around 300-350, will take you 5/6 hrs. We recommend you to leave for
Gangotri as early as possible before 7 AM. Then take another shared cab from Uttarkashi to Gangotri.
FINEST TIME TO EXPERIENCE
There are only two season for Gaumukh Tapovan trek, otherwise it is deep buried under heavy snow. The first season is the Summer, during Mid-May to end of June. And another season
is Autumn, during Mid-September to end of October. These are the best time to do this trek.
Gaumukh trek in summer – As in the spring there are still too snow to achieve the Gaumukh & Tapovan, the is a the season when its get open. In early summer there are few snow left
in the valley, so few fellow trekkers who loves snow go for this time. This is why it is the popular season also. In the late summer there will be no trace of snow, the trails and
valley get alive with lots of vegitation starts turning into green.
Gaumukh trek in Autumn – The season Autumn actually offers the best clear views than summer. The late Autumn is totally no snow with dried up shrubs and grasses, golden-brown look.
The river Bhagirathi slows down in current, the Chirbasa turns into maroon-brown-yellow land. In this season you might experience little pre-winter snowfall on the valley. The sunrise
and sunsets are more beautiful in this season as the atmosphere is more clear than summer. One can experience clear night sky slightly visible the galaxy with naked eyes. Night
photography will best in this season. This Autumn ends up by end of October as snow blocks the high altitude trails.
HOW DIFFICULT IS THIS TREK
After considering the trail, highest altitude, terrain, steepness, trek hours on every day, altitude gain, weather etc we decide to rate this trek as Difficult one. This is not a
beginners trek at all. But a very fit beginner with very good endurance and stamina may do this. But we recommend you at least have one trek experience before. You cannot bring your
kid here. He/She must be above 18 years of age and must have previous moderate class trek experience.
TREK INCLUSIONS
- Stay included from Day 1 to Day 7. Homestays and tents are included on sharing basis.
- All meals after reporting at the base village Gangotri are included.
- All camping gears are included.
- A medical kit, oxygen cylinder and necessary items to counter worst case scenario.
- A certified Trek Leader, well trained and experienced Guide, Co-guide(if necessary) are included.
- All the forest permission and entry permit are included.
- Transportation included from Dehradun to Gangotri and vice versa.
TREK EXCLUSIONS
- Any meals on road journeys.
- Personal hiking gears.
- Separate room for couples (charges apply if booked prior).
- Porter or mules for carrying personal luggeages.
- Any personal expenses on shops/dhabas.
- Any unscheduled stay/departure out of the itinerary due to unforeseen weather conditions, govt ban, natural calamities, medical emergencies.
WHAT TO CARRY ON GOMUKH TAPOVAN TREK
Like other treks bring all the trek gears and personal hiking gears. But the first thing you need to carry on every trek is a bit fitness and endurance. So before attempting
a trek always do some Cardio and other endurance exercises to build your exercise. And in the list of hiking gears includes Rucksack, Waterproof Trekking shoes, warm layers of Jackets,
Thermal Inners, Woolen and sun caps, Sunscreen(SPF 40) and toileteries, good quality waterbottle, multiple pair of socks, lighyt wieght rain poncho or jacket, warm gloves, a day pack
Headlamps with extra cells, sunglasses etc. If you are checking for this trek we believe you are a pro trekker, so you know better what to bring on a trek as of previous experience.
At last if you have any queries or its confusing what to carry, please feel free to contact us. Don’t overwaight your backpack, otherwise trek will seem to be very difficult.
Frequently Asked Questions
Acclimatisation is the most important part of high altitude trek. Acclimatisation is the process where your body start getting cope up with mountain weather & atmosphere that is
different from your hometown. This change of environment may affect your normal performance in that environmental conditions. So you need to be well acclimatise to safely do the
trek. Not every time depend on the high altitude medicines to avoid AMS, go for natural acclimatisation. Otherwise your body will depend permanently on the medicines whenever you
go to the high altitude. The natural acclimatisation is more powerful than medicines. We need to accept the himalayas as it is challenging. It is not that himalayas are unbeatable,
but requires to follow rules and systematic approch.
How do human body actually acclimatise to the high altitude? In the high altitude the air pressure gets lower so the density. That is why the molecules spreads out in more space and
get apart from each other. This affects lower oxygen consume per breath. Our body reacts with that change and starts to take more breath that is hypoxia. We often called it
breathlessness in laymen term. Then body try to take more breath to reduce the level of carbon dioxide in our blood. This results increase pH of blood, making our blood more alkaline
and body starts urinate more for exerting of bicarbonates.
On the other side the body starts to produce more hemoglobin count which are the oxygen carriers in our blood. This thickens our bloods and now our heart need to pump more to throw
the blood in the distant organs hence the blood pressure gets higher. This indicates slight high pressure and pulse rate is normal in high altitude areas.
There are three golden rules to acclimatisation in the field of mountaineering is –
1. Climb high sleep low
2. Ascend slowly, take your time. And do not over exert.
3. Hydrate & hydrate yourself more & more.
Our expert justified few ways to acclimatise naturally are discussed below-
At first check your itinerary. Trekking is not a game in hurry. You need time to complete. It is not anything you achieve but enjoyed. This is a sport that is away from any competition. Any trek should not be judge by time & distance. Do not over exert yourself, don’t go beyond your limits. Fix your itinerary comfortably. Do not try to cover more distance and altitude gain in one day to minimize the trekking days and cost. On the very initial days approach slowly even you are fit enough to trek faster. Take more time to gain altitude. This allows your body enough time to adjust with the atmosphere. Always bring a well hydrated body in the Himalayas and keep hydrated yourself on the trek days. Drink 3-4 liters of water every day on trek, and consume enough tea, soup, dal and other liquid includes in your meals. Do not consume any type of alcohol drinks 2/3 days before you start the trek, and also don’t on the trek. We do not allow any trekker to consume alcohol on the trek, if found he/she will be sent back then and there. We do not also advise to consume any hard drinks, too much coffee is also not good. ORS and other energy/glucose tablets are best on the trek. After arriving on trek base, trekkers may feel cold weather. But do not cover yourself fully with all of the woolen cap, muffler, neck warmer and all. Let your body to sense the atmosphere change with the sense organs. It will help in natural acclimatisation. Allow your skin to feel the cold. your ears to sense the pressure change. Keep that open while gaining altitude, unless there is a blizzard or bad weather condition. Don’t be a show off man, don’t show unnecessary bravery. Keep your body protect from cold weather. Protect your body from cold wind, cover your head at night & bad weather, cover your neck, tonsils and body tip like fingers, toes etc. Get proper sleep at night. It doesn’t mean that you should sleep at day time or in the afternoon as soon as you reach the campsite. Sleeping is important on every trek to get refresh and rest for next day trek. If you find difficulty in sleep bring immediate notice to the trek leader or guide. As you reach the trek base try to keep yourself dry, do not loose the body heat. Do not skip your soup in the evening. The garlic soup & other helps in blood circulation, keeps your body warm. You remain active on the high altitude. After reaching campsite everybody gets tired, this is normal. But do not get into your sleeping bag & take a nap. This will not help you to get acclimatise. Have some rest for a while, then explore the nearby places, go for the acclimatisation walk. You need to follow the golden rule ‘climb high sleep low’. Climb a bit higher in acclimatisation walk and get back to the campsite. You can indulge yourself in games, or can go for photography. Eat proper meals throughout the day, but lite. Not so much spicy foods, consume easy to digest foods more.
Trekking is a adventure sports, you need to bring a sportsman sprit and fitness on any trek. There is a big worry in many trekkers that how much they need to be fit for a trek.
The himalayas are full of steep uphill, rough terrain, walking in the snow all these can be very challenging for trekkers specially for beginners. We will discuss here how to get fit
for any trek with a complete training guide.
Trek to uphill mountain is not in our daily routine so it is simple that we will find it tough to climb uphill. And with a backpack it seems very challenging. But only a month of
regular exercise can make you fit for the trek. Cardio exercise is the best for pre trek exercise. Do some cardio exercise like jogging, swimming, cycling, jumping jacks etc will help
you to build your endurance. Don’t forget to do some leg exercise like squats, lunges, stair climbing etc to build stamina of your legs.
Now we made a routine exercise for you –
1. Cardiovascular endurance : On your trek you will constantly gaining altitude with your backpack in low oxygen atmosphere. Your heart will do more effort in this condition. So you need to go through cardio exercise at least for one month regularly to counter this constant uphill climb comfortably, infact you will find it bit easier. Jogging for 4 kms in 30 minutes is your first target for this. Start with slower jog and continue to fill the target.
2. Leg exercise : After one week of jogging add some leg exercise like squats and lunges to your routine. This exercises will build stamina of your leg that will help you on steep uphill climb. Start with 10 squats and 10 lunges of 2 set in first week. Then increase to 3 sets. Try to fulfil your target to do 3 sets of 15 each before the trek.
3. Strengthening the core : For strengthening your core body plank and hip raise are best. Do plank for 20 seconds for first three days and then start increasing by 10 seconds till 60.
Along with that do 10 hip raises 2 sets, and increase for 3 sets of 15 each. That should be the goal. So, get ready for your next adventure, make yourself fit enough to do the adventure activities.
There are three level of fitness we categorise :
Level 1 : It is the minimal fitness with that you just able to finish the trek. You struggle a bit, but not too much to do the challenging section. We find most of the trekkers with this much of fitness.
Level 2 : This is one level up fitness you bring on the trek, that you find the trek not very difficult or moderate but easy. And you can carry your own backpack easily throughout the trek. You don’t feel exhausted at the end of every day trek. You are find yourself still not tired and active after reaching the destination. You enjoy the other activity and enjoy exploring the nearby or involving yourself in some game.
Level 3 : This is the fitness we admire most & the ultimate mountaineer like fitness. The trekkers with this fitness finds trek easy for them and they are still very active after the whole day trek even with their rucksack. Not only that these people are fit enough to tolerate bad weather conditions, contribute in some work like tent pitching & kitchen activity, bringing water from nearby water source. Give a hand if other trekkers are in trouble or in some rescue operation.
Rucksack is a most important equipment on every trek & packing your rucksack is a important task for your trek. On a typical trek you need to carry your own rucksack, and if your
rucksack is not comfortable to carry you will eventually start hating your backpack and also the trek. A rucksack need to be perfectly pack that it should be comfortable to carry
on your back. It should not hurt you anyhow. The mordern day designed rucksacks are very light weight and have many chambers to pack seprately. A good quality rucksack have well
paded for comfortable carrying in waist and shoulder. If you are planning to buy a rucksack, please keep the things in your mind and don’t forget to check the strength of rucksack and
other straps.
Before you pack your rucksack go through our basic rule. This will help you to pack easily as a beginner. You just can not do every day packing and unpacking on multiple day of trek. Imagine how irritable and time consuming that will be. The A B C D E rule to pack your rucksack—
A – Accessibility = While packing your rucksack pack in such way that every thing are easily accissible for you. Use the different parts to achieve different things easily. For an example use different chambers for toileteries, different for your dry fruits and snacks, different for clothes, different for small items like gloves, socks, woolen caps etc. Keep the items at top or side pockets that you may need on the way like rain wears, sunglass, sunscreen etc.
B – Balance = Your bag need to be packed in such way that it can stand straight when you leave your backpack alone on a flat surface. The more your backpack is balanced the less it will hurt your shoulder. The weight distribution on both shoulder should be equal in order to comfortable carry.
C – Compression & Compartments = While packing your backpack compress all the cloths and the things that can be compresed. It will give you more space inside your rucksack. But remember don’t do more compress or less, do as much as it needed. Compress till it gives you more space to adjust other things. Now use more compartments or make more compartments by using different colored plastic bags, like for socks and underwear use red color plastic bags, for inner and thermal clother use yellow bag, for woolen cap & gloves use green one. It will not only give you another layer of waterproofing but also help you recognise all the different things. This will also help you to find your stuffs quickly.
D – Dry = Always keep your backpack dry from outside and inside also. Use rain cover from outside. And from inside all of your stuffs should be kept dry, otherwaise it will be more heavier than usual. Wet rucksack is not only heavier but also prone to damage, not good for rucksack maintenance. Use rain cover to protect from get wet.
E – Environment = Make a list of your stuffs that need to be packed inside the rucksack according to the environment of the trek you are going. Keep in mind the weather in that perticular month you choose to trek. Pack your backpack with stuffs you need in that weather conditions.
EXPERT’S ADVISE:
-> Always keep the heavy things in the middle of the rucksack and closer to your back.
-> The medium weight things should be kept in the lower compartments & liteweight items should be kept in top section of your rucksack.
-> Use plastic layer from inside to keep the stuffs dry.
-> Don’t forget to put rain cover from outside in rain and snow.
-> Adjust the shoulder straps to balance weight on both shoulder. Put the waist starps also to get better support and balance.
-> You can use you rucksack as a pillow inside the tent, or can rest your leg on rucksack.
Lots of trekkers are very worried about their accomodation on trek days. Wheather it gonna be comfortable or not, safe or not. Here is the answer. We have the good quality tents and
sleeping bags for high altitude treks. Our mattress are very soft and thick to provide a comfortable sleep at night. But you should keep in mind that trekking in wilderness in himalayas
are not any four or five star category. This is an adventure trip, if we provide a homely/hotel feeling on your trek, then there will be no adventure left for you. But obviously
we will definitely provide a safe and cozy tent for your stay. Our tents are tested in bad weather conditions also. Sleeping bags are very warm to spend nights with a good sleep.
And at the trek bases we arrange the best homestay available at the village. Homestays are sanitised and clean from inside. Toilets are well maintained and hygiene.
We go to the each and every trek base we organise and choose our guides on the basis of their experience, behaviour, past record, knowledge, abilities and good personality. They
knows all about the routes and reacue & evacuation plans. They know how to handle in bad weather conditions. Our guides are well trained for work in the mountains, knows about
the camping gears. They have years of experience in safety methods and protocols on the trek. Our guides are very happy to help and eager to serve you better. They always maintain
health and hygiene. They are very friendly and make the more enjoyable for you.